 Cord Cutting,
  HTPC,
HTPC,  How To,
  Reviews
  Saturday, February 19, 2011 at 4:26PM
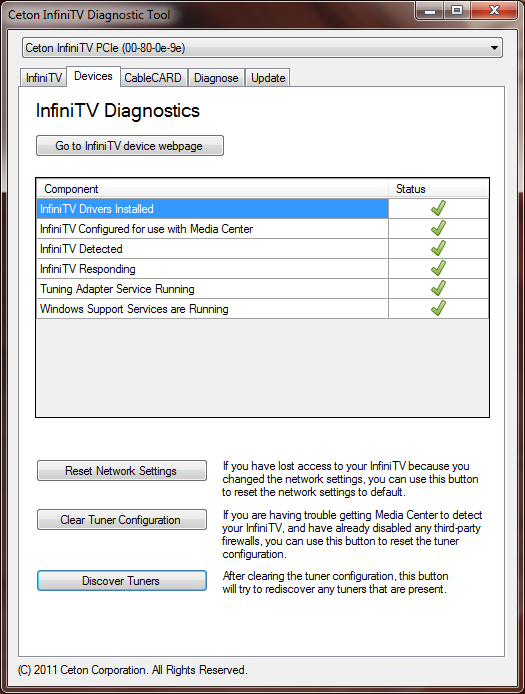
  Earlier this month, Ceton released an update for its InfiniTV Installer software for the InfiniTV 4 multi-tuner PC card that adds an automated driver/firmware updater. Always wanting to test the latest software on my gear, I installed the new Installer and upon completion it warned me that I may have to redo the TV tuner setup in Windows Media Center (Windows 7). Sure enough, I needed to redo the tuner setup, and I immediately encountered an issue where Media Center was no longer properly detecting the InfiniTV 4's tuners. Following the Installer software's suggestion, I used its tuner reset/detection tool that is supposed to assist Media Center when this issue arises.

My first few attempts at clearing the tuner configuration crashed the diagnostic tool, and attempts at redoing the tuner configuration within Media Center failed with tuner #1 (of 4) not being listed. Finally, I tried running the diagnostic tool as administrator...success! I was able to clear the tuner configuration without crashing the app, and the tuner setup in Media Center then proceeded without further issue.
My HTPC is back up and running smoothly, and my once-cherished TiVo Series3 continues to sit in my AV rack in standby mode.
 Cord Cutting,
  HTPC,
HTPC,  How To,
  Reviews
  Wednesday, November 24, 2010 at 4:20PM
 This exciting installment of my project to build an efficient home theater PC features (arguably) sexy shots of the component assembly process, and then I'll discuss the selection of software I've installed...so far. If you are interested in (re)reading part one of this epic project, then please click this link.
At the heart of every computer is a motherboard, and the Zotac IONITX-F-E Atom N330 wastes little of its 6.7 by 6.7 inch footprint. The F-E's x16 PCIe slot enables a plethora of upgrade options, and I'm thinking 'TV tuner'.
Here is the Winsis Wi-02C case splayed open with its removable drive cage stacked on top. The front-facing slot on the cage is for a slim optical disc drive.
A closeup of the drive cage with the LG CT10N Slim SATA Blu-ray Drive installed. The SATA port barely visible in the lower section of the cage is attached to the 500GB 2.5-inch WD Scorpio Blue.
Installing the Zotac board was a pleasant 4-fastener affair, and the 4GB Corsair DDR2 (2x2GB) awaits installation. The exhaust fan on the right (above picture) is connected to an available plug on mobo's facing edge (immediately left of the ATX connector). I'd later disconnect this fan to further quie
The above picture shows everything connected, and the USB-based BIOS updates and OS installs are convenient and fast. The power supply unit included with the case claims 200 Watts maximum output - this collection of hardware should require less than half of that. The chips' passive cooler proved effective in temperature controlled environments, and a small fan (included) can be attached for additional cooling performance.
And...Behold! I was disappointed that the case's openings for the multimedia card slots (top) were slightly undersized making actual use all but impossible. My initial power usage measurements for the HTPC show an average consumption rate of 53 Watts under full load.
A look at the back. I've come to appreciate the Zotac F-E's selection of digital audio outputs in addition to HDMI. Note the USB Cirago Micro Bluetooth Adapter (about $20) in the port at the top.
Software Selection
My initial software load on the HTPC centered around using Windows 7 as the operating system. I selected Win7 for a few specific reasons - one being that I had an extra copy on hand, and I'm fairly familiar with its installation and use. Windows 7 also includes the latest iteration of Windows Media Center (WMC) that supports CableCard adapters such as the Ceton InfiniTV 4 ($400) - I eventually want to take advantage of WMC's free channel guide updates in order to build my own HD cable DVR. WMC also provides a unified interface for enjoying collections of music and pictures as well as various sources of Internet-based multimedia including Netflix video streaming.
My collection of movies on disc include a mixture of physical formats including DVD, HD DVD (remember those?), and Blu-ray. I wanted one application to play them all, and ArcSoft's TotalMedia Theater Platinum ($100) seemed up to the task, and it integrates seamlessly into WMC.
Kaleidescape has set the standard for how a modern movie server should look and perform, and I wanted to create a similar virtual "wall of jewel cases" with my own collection of titles - and do it with a fairly modest budget. My Movies for Windows Media Center provides this functionality for free. For the movie titles I have archived on my network attached storage (NAS) device, My Movies can take advantage of virtual drive applications such as SlySoft's excellent Virtual CloneDrive (free) to automate the mounting of image files.
Control
I'll finish this chapter of my HTPC build with the apps I'm using to make the entire system easier to control and use. My primary criteria for potential control devices is 1)wireless - preferably Bluetooth and 2) the input device must provide fast, consistent responses.
I wanted to use a Sony PS3 Blu-ray Disc Remote (under $20) that I already owned as it's a Bluetooth (BT) device and the remote's keypad layout is essentially identical to a standard Windows Media Center remote. In order to make the PS3 remote's keypad correspond to the same commands as an official Media Center remote, I discovered (via The Green Button forums) and embraced Ben Barron's handy PS3 Remote Application. And after trying a couple of inconsistent RF-based wireless keyboard options, I settled on the Logitech PS3 Cordless MediaBoard Pro for its relatively affordable price (among BT keyboards) and near-perfect wireless performance.
A recent smartphone purchase has enabled me to try out some of the remote control applications that are available. One app I find myself regularly using is HippoRemote Pro ($5). HippoRemote connects to my HTPC via my local network and provides control profiles for a long list of common PC applications including Windows Media Center, TotalMedia Theater, and even Windows 7 itself. The app's response performance with my setup is excellent - equal to or even better than the BT remote I use regularly.
What's Next?
In the follow up to this chapter of Project HTPC, I'll provide more insight into how the system is used in my household. I'll also take a closer look at the Ceton InfiniTV 4 digital cable tuner including its installation and use. A DIY Digital Video Recorder (DVR) that could replace a cable company's DVR or even a TiVo is certainly possible nowadays, and the questions I want to explore include: is the total cost worth it? And, how reliable is a DIY DVR?
Stay tuned!
 Cord Cutting,
  DVR,
DVR,  HTPC,
HTPC,  How To
  Thursday, August 12, 2010 at 3:01PM
 Updated on October 24, 2014
If you purchased a gallon of gas and it measured 5% less than advertised, would you still call it a gallon? When it comes to viewing high definition (HD) video on a high definition television (HDTV), many HDTVs have a nasty habit of hiding (literally destroying) visual information along the border of the video image reducing the detail and clarity of the remaining visible picture that fills the screen. The excessive scaling of video beyond the edge of a TV's screen is referred to as overscan and it is often expressed as a percentage of the sacrificed video picture - a TV that exhibits 5% overscan fails to display the outermost 5% of the video border.
Examples of Overscan
The following pictures show the lower right corner of a 1080p flat panel HDTV's screen including a bit of its black bezel. This HDTV has a default overscan of about 6% as well as an underscan display mode that reveals every pixel of the incoming video signal. The left half of each picture shows the TV screen with its default overscan setting, and the right half shows the exact same portion of the TV's screen and the same frame of video but with overscan disabled - an underscanned picture. In each picture I've highlighted the details concealed by TV's default overscan mode in yellow.
Heron Fidelity's Cord Cutting Guide
Why Overscan is Bad
The relatively small percentages of video overscan I've mentioned may not sound like much, but the losses incurred scale with screen size. A 65 inch 1080p RPTV with 6% overscan (a typical amount) is missing 1.7 inches of video data from the left and right sides of an HD image - a total of 3.4 inches of lost visual information along the horizontal axis. With full-frame 1080p video, a 6% overscan equals a loss of over 124,000 video pixels - regardless of screen size. Any amount of video overscan introduced by a display device can soften the picture and it always results in significant loss of detail.
Robert's Favorite Home Theater Gear
Eliminating Overscan
Common picture size settings that eliminate overscan are labeled as Just Scan, Dot-by-Dot, Screen Fit, and sometimes simply Overscan with a related on/off setting. Many new TVs default to a picture size setting labeled 16:9 that unintuitively produces an overscanned image. Also, overscan controls are often configured per video format. So turning off overscan for 1080i/p video sources doesn't automatically turn off overscan for 720p or standard definition sources.

Check Today's Audio and TV Sales
Fix it or upgrade
It doesn't matter if the video source is a favorite HD channel, a next-generation game console, upconverted DVD, or Blu-ray movies, a good HDTV doesn't waste a single pixel - you should see everything as the content creator intended! Of course a HDTV can degrade image quality in any number of other ways, but video overscan shouldn't be one of them.
 Calibration,
  How To
  Tuesday, April 27, 2010 at 7:22PM
  The Internet is an unlimited source of personal entertainment, and a fast growing portion of this online content includes popular television shows, radio stations, and feature films. The personal computer (PC) is an ideal platform for accessing online multimedia as its compatibility with the wide variety of content streaming technologies and downloaded file types is unmatched by any non-PC set-top box. Ditching a cable/satellite television subscription in favor of a PC and broadband Internet service isn't for everyone, but the potential savings for a household could add up to thousands of dollars per year.
My HTPC parts list ended up containing the following:
The total for the above parts list was about $740 before taxes and shipping. I already had a spare copy of Windows 7, so that brought the bill down to about $570. Blu-ray and CableCARD support were my primary reasons for using Windows 7 (with its integration of Windows Media Center) - these needs aside, use of a community-developed operating system like Ubuntu (running XMBC) would have further reduced initial costs. Another somewhat extravagant part in the above list is the LG Slim Blu-ray Drive (about $170 online) - slim DVD+/-RW drives can be had for as little as $40, or just skip the optical drive altogether depending on your needs.
 Cord Cutting,
  DVR,
DVR,  HTPC,
HTPC,  How To
  Saturday, February 13, 2010 at 12:34PM
  It has been more than a week since I performed the "Clearing and deleting everything." function on my Series3 TiVo, and I'm happy to report that the S3 has since performed perfectly: wireless file transfers complete with consistent throughput, Netflix HD streams are received in full quality, and overall system response has greatly improved. One odd side-effect of the TiVo mind-wipe was the loss of a few specific digital cable channels. Thinking that the channel loss was related to a pairing/binding issue with the CableCARDs (the S3's lack of multi-stream CableCARD support requires the use of two CableCARDs for dual-tuning action), I contacted my cable provider and requested that they check things on their end. After confirming the cards were paired and activated, I was still unable to receive about four digital channels. CableCARD paring issues sometimes result in the inability to receive copy protected channels/programs but the fact that each card/tuner was able to receive the encrypted channels that I subscribe to suggested that the cards were correctly configured on my end. Luckily, the cable tech who was dispatched to diagnose the problem (unsuccessfully) encountered the exact same CableCARD channel loss issue with another customer later that same day. The cable-gods at this point believe the issue is on their end and they are currently investigating. Stay tuned.